|
|
 |
|
|
To help novice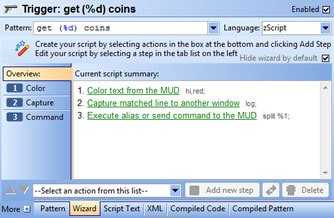 users learn how to create simple scripts, a new Script Wizard has been added. It uses a step-by-step GUI to help users create simple scripts, such as coloring text, gagging lines, substituting text, etc. users learn how to create simple scripts, a new Script Wizard has been added. It uses a step-by-step GUI to help users create simple scripts, such as coloring text, gagging lines, substituting text, etc.
For expert users, you can easily turn OFF the Script Wizard by enabling the "Hide wizard by default" checkbox in the upper-right portion of the Wizard tab. You can also turn the wizard off or on using the View/Use Script Wizard menu option in the Package Editor.
When the Wizard is disabled, you can still use it any time by just selecting the Wizard tab along the bottom of the Package Editor instead of the Script Text tab. The "Use Wizard" option just determines which tab is selected by default when you enter the package editor.
You can freely switch between the Wizard tab and the Script Text tab. When you select the Wizard tab, your script will automatically be parsed and split into "steps". When you select the Script Text tab, your entire script will be displayed as normal text.
Steps
The Script Wizard splits your script into simple steps. It performs this on a line-by-line basis, and only examines lines that are not indented. So currently the wizard will not split items within a block (like a #IF block) into steps.
Anything the wizard doesn't recognize as a simple step is treated as a Custom Script step. Steps can also be split by placing a // comment at the beginning of a line. For example, the script:
| Code: |
a = 123
// next step
b = 456 |
will be treated as two Custom Script steps. The // comment will be used as the description of the second step.
The following Step types are currently recognized by the wizard:
- Execute alias or send command : Used when referencing an alias with or without arguments, or when sending simple commands to the server.
- Send text : Uses the #SEND command to send text to the server.
- Print text to the screen : Uses the #PRINT or #SAY commands to display text on the screen. The #SAY command is used if the "Allow triggers to fire on printed text" option is selected.
- Play a sound : Uses the #PLAY command to play a sound, or uses the #BEEP command to play a simple beep.
The following additional Step types are recognized by the wizard when creating a Trigger:
- Color text : Allows you to select the text color, background color and text style for text matched by a trigger. You can select whether to apply the color to the entire line (#COLOR) or just the matching words (#CW). This is one of the most useful wizards since it allows you to select the colors interactively via the GUI rather than memorizing color names or color hex values. Even advanced scripters will benefit from this wizard.
- Substitute matching text : Uses the #SUB command to substitute text for the pattern matched by the trigger.
- Capture matched line : Uses the #CAPTURE command to send the matching trigger line to a different window.
- Remove matching line from screen : Uses the #GAG command to remove the matching trigger line from the screen.
Adding steps
To add a new step to a script, select the type of step you wish to add from the drop-down selection at the bottom of the editor, then click the "Add new step" button.
Each step in the script will be shown as a numbered tab along the left side of the editor. The first tab is labeled "Overview" and will display a simple overview of your entire script. In the Overview tab, you can also select a step by clicking the hyperlink for each step description.
Steps can be re-ordered by dragging/dropping the step tabs into new positions, or by selecting a step and using the "Move Up" and "Move Down" buttons in the lower-left corner of the wizard.
To Delete a step, select the step and click the Delete button.
You can also convert certain steps into different step "types" by selecting a step, then select the new type from the drop-down selection, then clicking the "Convert step" button located between the Add and Delete buttons. The "Convert" button will only be enabled if you have selected a compatible new step type. For example, any step can be converted to a Custom Script step. But you cannot convert a Color step into a Print step for example.
Remember that the Script Wizard is just a different way of looking at your script, or an easier way to create a simple script from scratch without knowing anything about the zScript language. You can still access your "raw" script using the "Script Text" tab. Once you are comfortable with scripts, you'll probably want to turn off the Script Wizard by default and then just use it when needed for simple scripts. |
|
