|
|
 |
|
|
Introduction to Aliases
Aliases are another way to simplify your life of MUD playing. Basically, aliases allow you to assign any command to a shortcut abbreviation.
The easiest way to create an alias is to type the command or words you want to make a shortcut for, then press Control-A, or select Make Alias from the Action menu. You will be prompted for the shortcut abbreviation you wish to assign the command to. For example, enter the text fill waterskin statue and press Control-A. Then enter fs and click OK. Now, whenever you enter fs in the command buffer, the string fill waterskin statue will be sent to the MUD.
Note that aliases are only translated if they are the first word in a command. In the example described above, if you entered the text say fs on the command line, the string say fs is sent to the MUD and fs is not translated.
Aliases Settings Editor
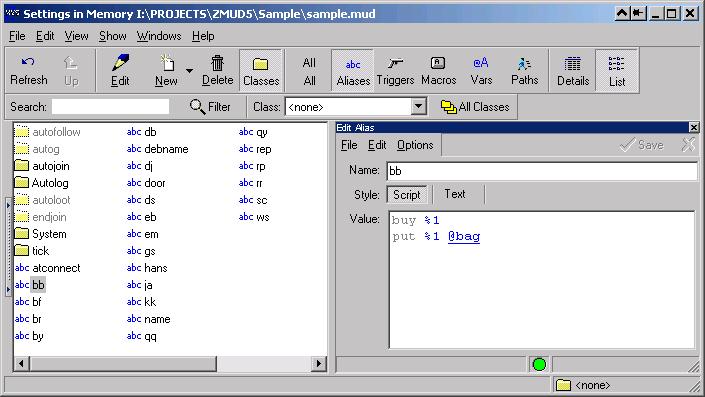
You can edit all of your aliases using the View/Aliases menu command, or by clicking the Alias button in the main toolbar. This brings up the alias dialog. All of your aliases (like fs from the above example) are displayed in the list. To edit an alias, double-click on it, or select it and click the Edit button. To define a new alias, click the New button and enter the name and commands for the alias. You can copy an alias by selecting it and using the Copy command in the Edit menu (or the right-click popup menu). Then select Paste from the Edit menu to make a copy. Multiple items can be copy and pasted. To delete an alias, select it and use the Delete command in the Edit menu (or the right-click menu).
This is an example of using the zMUD Settings Editor. It has a list of your settings, just like Windows Explorer shows a list of your files and directories. The buttons on the toolbar allow you to select what kinds of settings you wish to view. For example, to view Aliases, click the Alias button. To view Triggers, click the Trigger button. To view more than one item at a time, hold down the Shift or Ctrl key as you click the button. You can also click the All button to display all settings.
The Details button shows each setting on a separate line. The List button shows just the names of the settings and allows multiple columns of setting names to be displayed at once. When the Details button is pressed, you can edit the settings by clicking twice on them (not double-click, click once, then click again just like when renaming a file in the Windows Explorer). You can also right-click on a setting to see a menu of common actions.
To open the detailed settings editor, double-click on the setting to edit, or click the Edit button. The Edit button will always bring the Editor window to the front of all other windows. You can also dock the editor window to the bottom or right-side of the settings display if you want the editor to always be visible.
The Settings editor is used to edit all kinds of things in zMUD, not just Aliases. To learn more, go to the Settings Editor topic.
The ALIAS command
Another way to define an alias is using the #ALIAS command. Commands are typed entirely in the command input line at the bottom of the screen, but perform a function for zMUD and normally don't send any text to the MUD. Commands are provided for users of text-based MUD clients like TINTIN, and are similar in syntax. To create an alias with the ALIAS command, type #ALIAS shortcut {command text}. The command text will then be assigned to the shortcut abbreviation that you supply. You can also list all aliases by just entering #ALIAS, or you can list the definition of a single alias using #ALIAS shortcut.
Aliases can also contain Parameters. Parameters are the text following the shortcut. For example, if you enter fs foo bar, fs is the alias shortcut, foo is the first parameter, bar is the second parameter. Parameters are assigned to specific numeric variables %1 through %99. In the previous case, %1 would contain foo, and %2 would contain bar. You can use these parameters in the alias itself.
For example, define the alias #ALIAS k {kill %1}. Now when you enter k rabbit, the command kill rabbit is sent to the MUD. Now, this isn't a very useful example, because if you add text after an aliases (like rabbit in the above example) and the alias doesn't use it as a parameter, the extra text will just be appended to the result of the alias translation. Thus #ALIAS k kill followed by k rabbit will do the same thing. However, with parameters you can get more sophisticated. For example, the alias #ALIAS kk {kill %1;kick %1} followed by kk rabbit will send the commands kill rabbit and kick rabbit to the MUD.
Special Aliases
One last tidbit...if you assign a command to the alias atconnect, it will be executed whenever you connect to the current MUD. Other special aliases include: atexit which is executed when you exit zMUD, atdisconnect which is executed when you disconnect from the current MUD, onroomcreate which is executed after a new room has been created in the mapper, onroomenter which is executed immediately after room scripts, and onwalkend which is executed after onroomenter for the last room of a walk. |
|
